Sculpt Tool, Transform Box, Cut/Copy/Paste, Soft Delete, Topology, Stacking Order, and More
February 1, 2024
Hello everyone, and Happy New Year 2024 to anyone willing to tolerate such greetings in February!
This news was long overdue, and I (Boris) apologize for not providing more timely updates. I will try to do better next time, but don’t hesitate to join the Discord for more frequent signs of life, ask what’s up, or share your questions/feedback on the project.
Also, if you have supported the project on Kickstarter or Patreon, remember that you can always download the latest alpha versions on your VGC Dashboard, with new versions available typically multiple times per week. Contact me if you have any issues to log in, download, or install the software. The activity on GitHub (commits, issues, pull requests) can also give you some idea of what’s going on, even though it is usually quite technical.
On the bright side, the lack of news is mostly because we've been busy developing plenty of new features!

In particular, it was important to make as much progress as possible while Even was here, as he has now left VGC Software to work on his own projects. During his time here, he has made invaluable contributions to VGC Illustration, so we can all thank him for his work! Also, thank you to all contributors on Kickstarter and Patreon who made it possible to hire him for 19 months.
So, what’s new?
Sculpt Tool
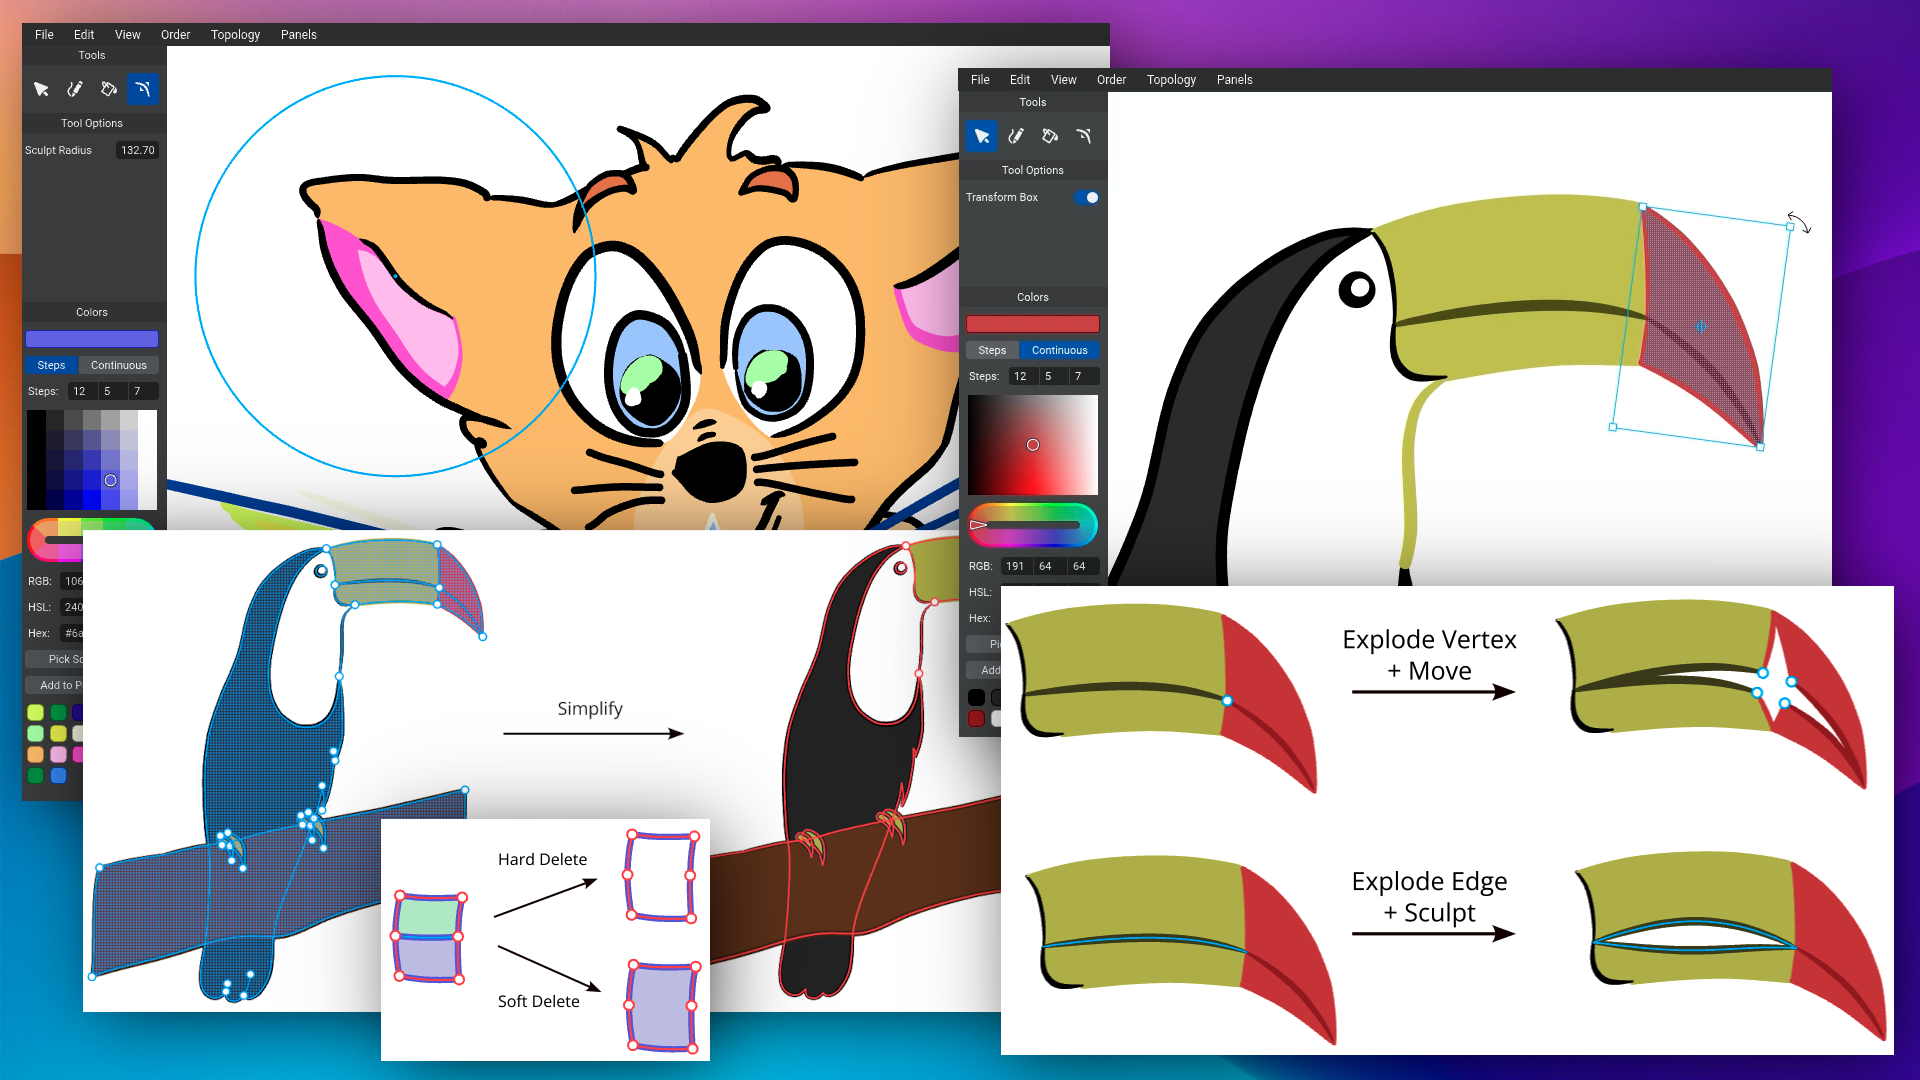
Here comes the Sculpt Tool!
Just click-and-drag with your left mouse button (= "Left Drag") to modify the curve. The following actions are available depending on whether Ctrl/Cmd/Shift/Alt/Options are pressed:
Left Drag: Push and pull the curve
Ctrl (Cmd on Mac) + Left Drag: Modify the “Sculpt Radius” (how far the tool influences the curve)
Shift + Left Drag: Smooth the curve
Alt (Options on Mac) + Left Drag: Change the variable width of the curve
This works both with open curves (see above) and closed curves (see below).
Note that implementing these sculpting tools in VGC Illustration was more difficult than in VPaint, because we use a more complex curve representation to make sure that it looks smooth at all zoom levels. In particular, it is a difficult mathematical problem to have good-looking curves when locally increasing the width of a curve. We experimented with a lot of approaches and it now looks reasonably good in most cases, but keep in mind that it may still look weird with very large widths, so it’s best to avoid those.
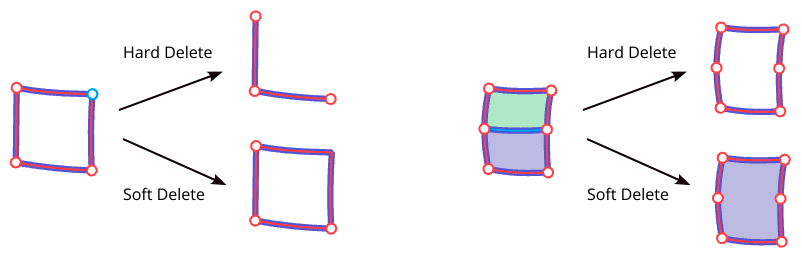
Transform Box
When in the Select Tool, there is now a “Transform Box” that you can use to rotate and scale the selection. Non-selected objects that are connected to the selection via shared vertices and shared edges are automatically deformed to preserve the connection.
Default: Rotate around the center, Scale relative to the opposite edge/corner
Alt (Options on Mac): Rotate around the opposite corner, scale relative to the center
Arrow Keys: Move the selection left/right/up/down by a small amount.
Shift + Arrow Keys: Move the selection left/right/up/down by a bigger amount.
For now, the pivot point cannot be changed manually and there is no “preserve aspect ratio” option, but it should be implemented soon.
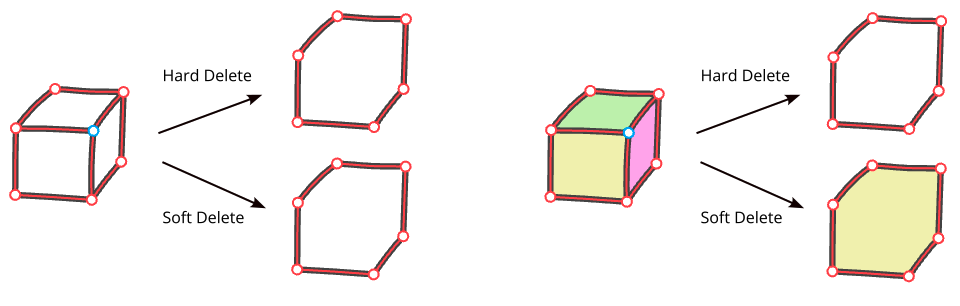
Soft Delete
Due to topological connections (shared vertices and shared edges), deleting objects is quite more complex to implement in VGC Illustration than in other 2D drawing software.
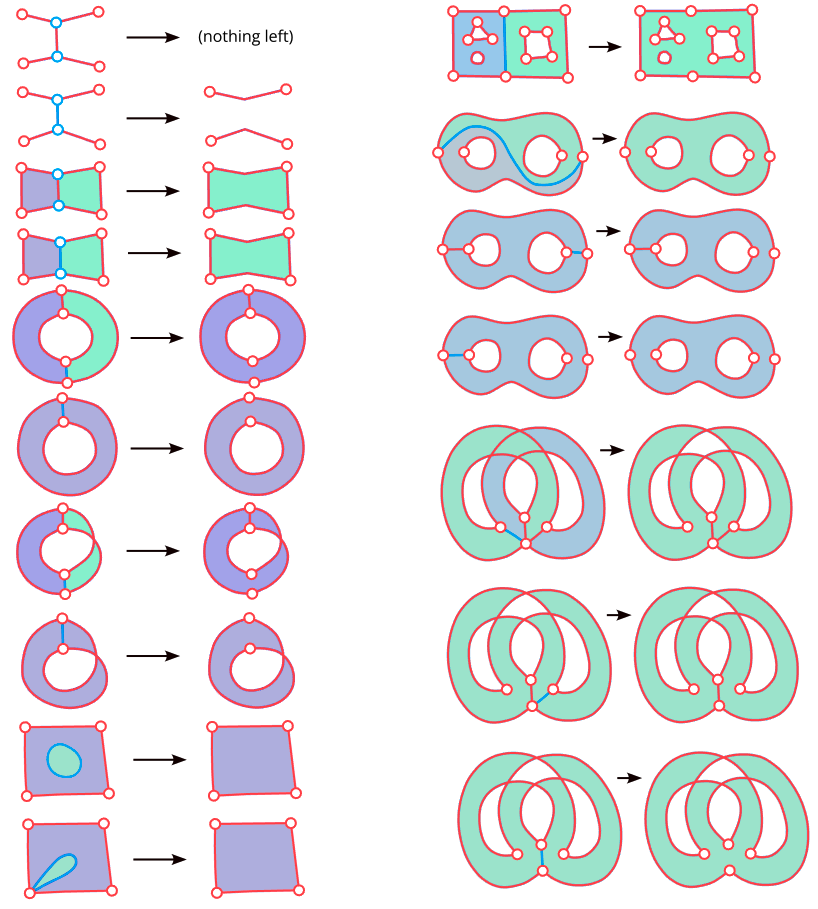
Initially, we had only implemented what we call “Hard Delete”, which is easier to implement. This operation deletes the selection and anything else that depends on it. For example, if you delete a vertex, this also deletes all the edges that end at the vertex, and all the faces that have this vertex in their boundary.
But we now have also implemented “Soft Delete”: this deletes the selection but also tries to preserve adjacent objects by merging them if possible. For example, if you delete a vertex connected to two edges, then the two edges are merged into one edge (the inverse of inserting a vertex in the middle of an edge). And if you delete an edge shared by two faces, then the two faces are merged into one face (the inverse of cutting a face with an edge). The face that had the larger area is used to set the color and properties of the new face.
In most cases, Soft Delete is what you need, which is why its shortcut is simply the Delete key (or Backspace). If you want to do a Hard Delete instead, you can hold Ctrl (Cmd on Mac).
Delete (or Backspace): Soft Delete
Ctrl (Cmd on Mac) + Delete (or Backspace): Hard Delete
Keep in mind that sometimes, it is impossible to merge adjacent objects after a Soft Delete. For example if you delete a vertex connected to 3 or more edges, it is impossible to merge the 3 edges into one single edge, therefore all 3 edges are deleted. This may or may not give the same result as Hard Delete, depending on the presence of adjacent faces (see below).
Also, isolated vertices (= not connected to anything) are automatically removed as a cleanup step, otherwise there would be plenty of leftover vertices when deleting edges. This means that sometimes, there’s nothing left after deleting the selection, even if you didn’t select everything.
Note that I’m not actually sure if Hard Delete is ever useful, especially since it’s always possible to obtain the result of a Hard Delete via multiple Soft Deletes. Do you think it would be less confusing to simply remove this functionality and rename “Soft Delete” into “Delete”?
Anyway, it can be quite fun to experiment with Soft Delete, especially if you have a technical background, see below for some results. You can notice how sometimes, when an edge is “used two times by the same face”, then instead of merging two faces into one, what happens instead is that a hole is added to the face.
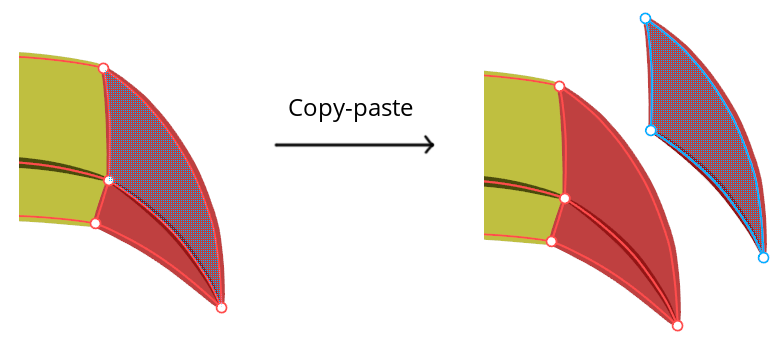
Cut, Copy, and Paste
These standard functionalities are now also implemented!
Note that when you do “cut”, it is deleting the selection via “Soft Delete”, not “Hard Delete”.
Also note that when you do “cut” or “copy”, it stores a copy of not just the selection, but also its boundary, to ensure that it can be pasted. For example, if you copy-paste a face, it creates a copy of the face but also of all the vertices and edges in the contour of the face.
Topology
A few useful “topological operators” are now implemented. Under this complicated name, we simply mean all the tools that let you change how things are connected to one another (shared vertices and shared edges).
Currently, these actions are available from the Topology menu (except “Insert Vertex” that requires clicking in the Canvas) or by using their shortcuts. In the future, we will also make them available via buttons in the interface.
Ctrl (Cmd on Mac) + Right Click in Select Tool: Insert Vertex
This is typically used to split a given edge by inserting a vertex in the middle of the edge.
However, it can also be used on a face. This inserts a “single-vertex hole” in the face (the vertex will move if you move the face), which can be used as an anchor point to connect other edges to the face, for example to connect the whiskers of a cat, as you can see in the video below (original sketch by Rodney, inking by me).
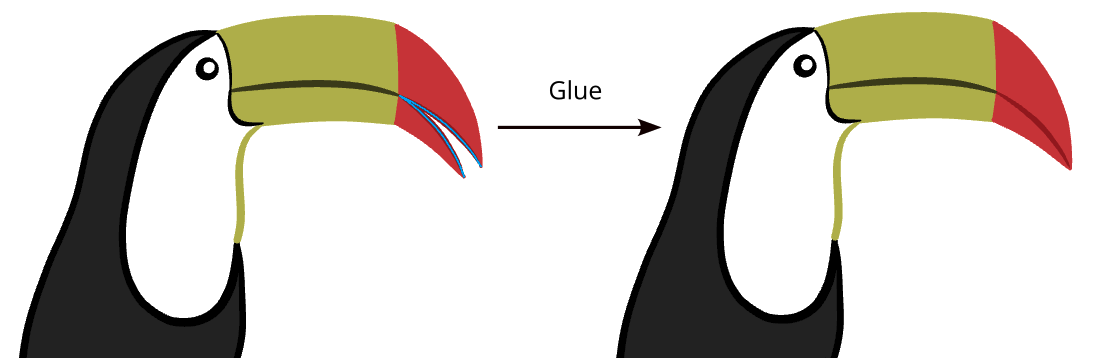
Alt (Options on Mac) + G: Glue.
Select two (or more) vertices and use “Glue” for them to become one vertex.
Select two (or more) edges and use “Glue” for them to become one edge.
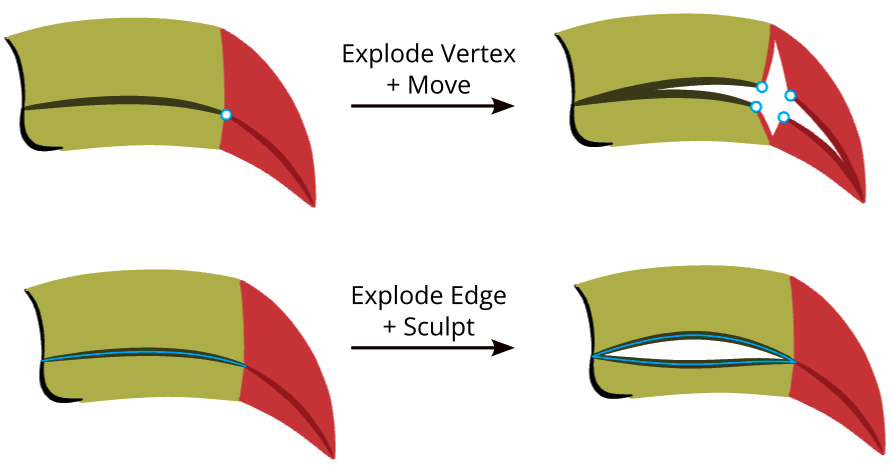
Alt (Options on Mac) + E: Explode.
This is basically the reverse of Glue. Select a vertex or an edge, and use “Explode” to duplicate it by the number of times it is “used” by adjacent objects. Note that when you explode an edge, only the edge itself is duplicated and all these duplicates still share the same start vertex and the same end vertex. So while it may look like nothing happened, if you use the sculpt tool you can see that there are actually multiple copies of the same edge.
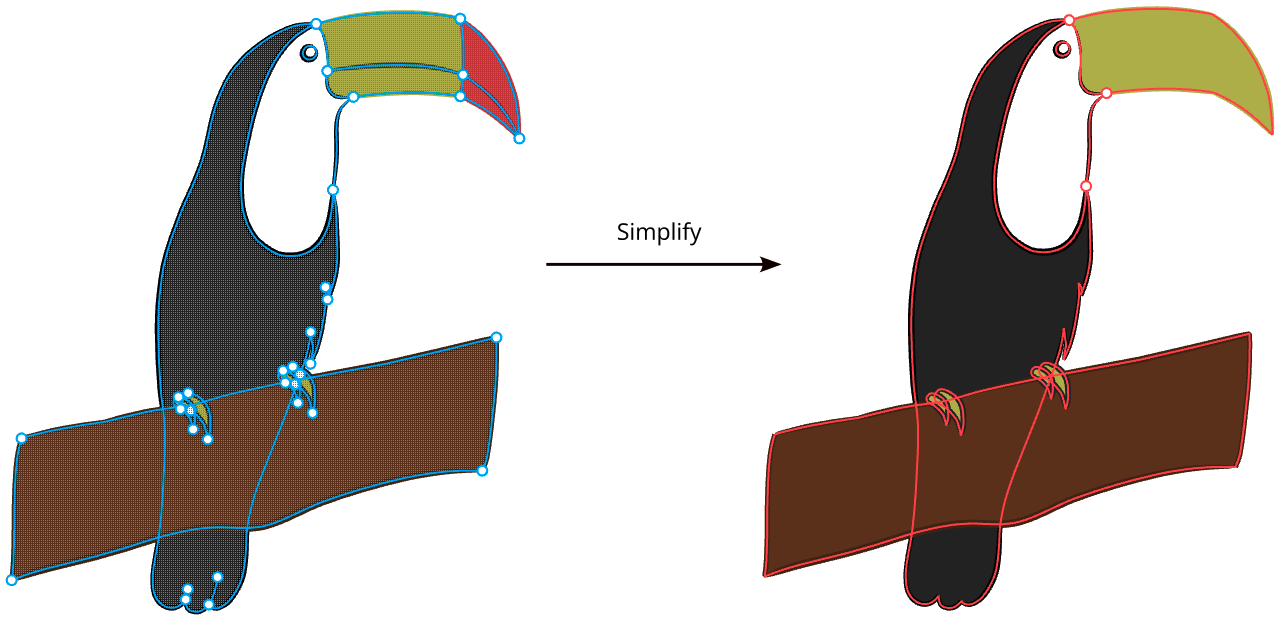
Alt (Options on Mac) + S: Simplify.
This removes all vertices and edges that can be safely removed by merging adjacent edges and faces, resulting in the same general drawing but with all inner details removed. Note that in the example below, the eye and the white area of the toucan are preserved because the white area is actually a blank/empty space, not a face. So the eye wasn’t connected to the rest of the drawing. But if the white area was actually a face, then both this face and the eye would have been removed.
Alt (Options on Mac) + S: Cut Face With Edge.
Select one face and one edge, and use “Cut Face With Edge” to split the face into two faces separated by the edge. Note that the edge must start and end in the boundary of the face, otherwise the action does nothing. Finally, note that in some cases it does not actually split the face into two faces, for example if the edge starts and ends at different “cycles” (= external boundary or inner hole) of the face. In this case, it joins the two cycles into a single cycle instead.
The next step is to implement an “Auto-Cut” mode in the Sketch Tool, that will automatically cut faces with newly sketched edges, so that in most cases you will not have to use this operator manually. In VPaint, this is called the “Intersections Mode”.
Stacking Order
It is now possible to change the order in which objects are stacked on top of each other.
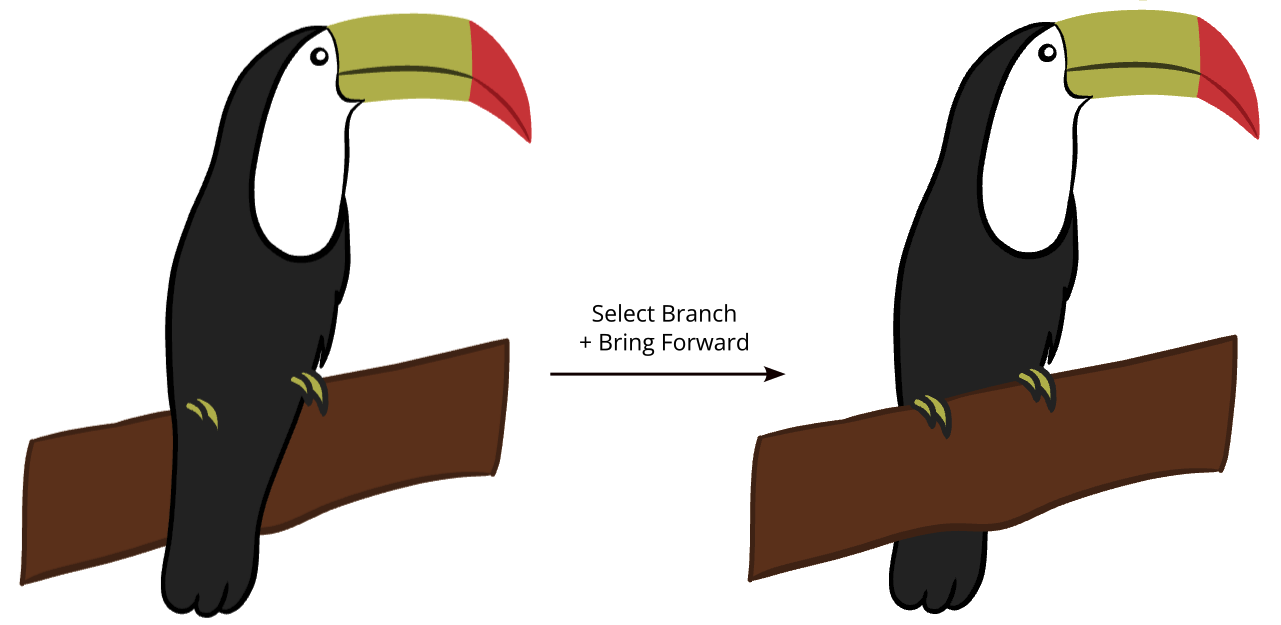
All of these actions are available in the “Order” menu or via the following shortcuts:
Page Up (or Ctrl/Cmd + ]): Bring Forward
Page Down (or Ctrl/Cmd + [): Send Backward
Ctrl/Cmd + Page Up (or Ctrl/Cmd + Shift + ]): Bring to Front
Ctrl/Cmd + Page Down (or Ctrl/Cmd + Shift + [): Send to Back
Note that a face and its surrounding edges have their own independent stacking order. This is necessary, otherwise the software wouldn’t know in which order to draw shared edges. To make it easier to change the order of a face together with its surrounding edges, all the reordering actions are “smart” and try to always keep edges on top of adjacent faces.
However, this behavior is still currently not smart enough, and there are many cases where the result is quite counter-intuitive and not what you would expect, especially when using “send backward”. Therefore, we will keep improving this algorithm, and we will also add more actions and settings to allow you to fine-tune the behavior and have manual control when necessary.
Like the topological actions, these reordering actions are currently only available from the menu or by using their shortcuts, but we will later add buttons in the interface.
Auto-Fill
If you enable Auto-Fill in the options of the Sketch Tool, then any time you sketch a closed curve (starting and ending at the same point within the snap radius), it is automatically filled with a face.
In the future, this might be extended to auto-fill shapes made of several edges, but for now it only works for newly drawn shapes made of a single edge. More info: GitHub Issue #1513.
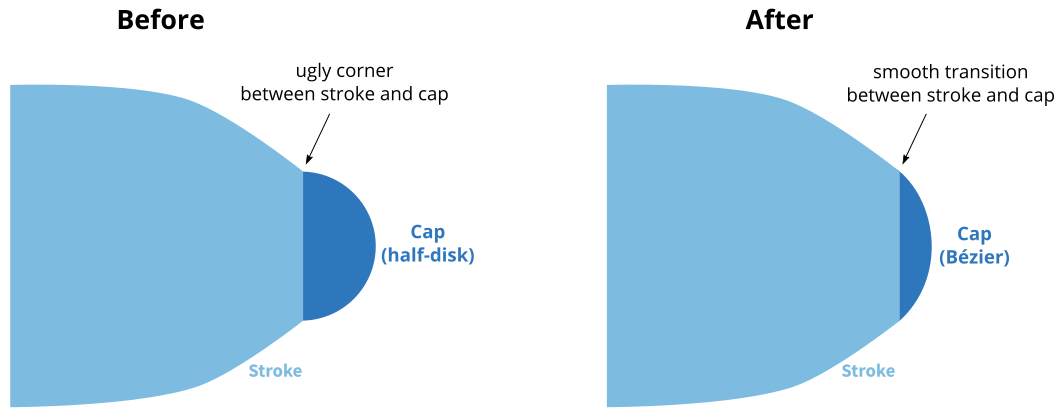
Smooth Caps and Curve Rendering
Smooth caps are now implemented, which makes the end of width-varying strokes look much nicer.
Also, we have generally made a lot of improvements on how curves are rendered, such as: using Centripetal Catmull-Rom interpolation of control points, better detection of “cusps” (special case when the halfwidth of the curve becomes larger than its radius of curvature), better interpolation of width data, and also developed a new “relaxed curve normals” technique. All of these help ensure that the curves look as smooth as possible, while using as few triangles as possible for performance.
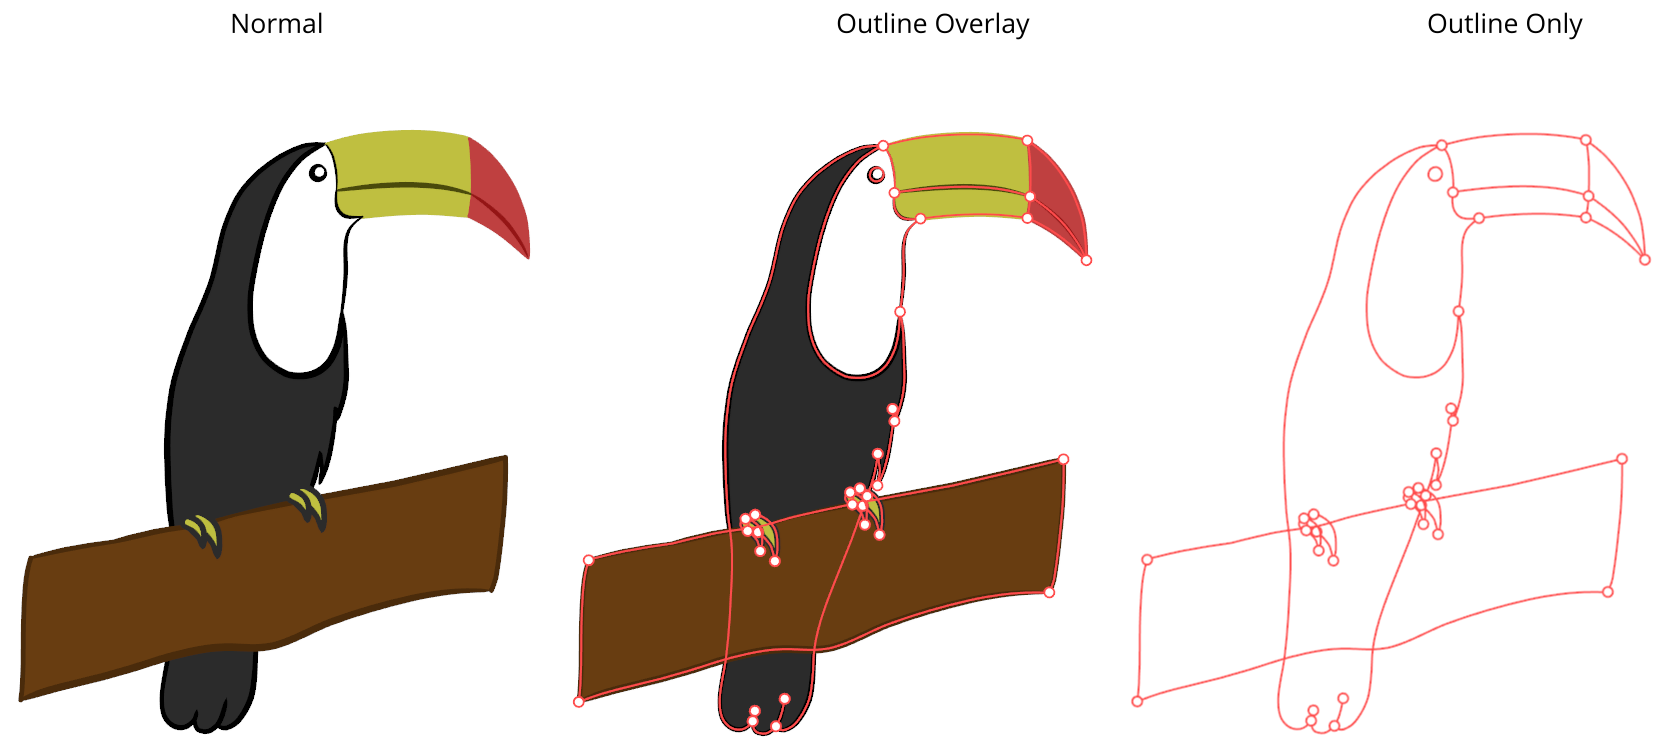
Display Modes
There are now three different display modes available in the View menu: Normal, Outline Overlay, and Outline Only. Showing the “outline” (= vertices and edge centerlines) is especially useful when using the topological operators, or checking whether two edges really share a common endpoint or are just “very close”.
You can use the following shortcuts to switch between display modes:
D: Toggle between the last two used display modes (by default, Normal and Outline Overlay)
Shift + D: Cycle between all three display modes
Fit View to Selection or Document
Ever got lost while zooming or panning the view? You can now use the following features in the View menu to automatically zoom and center the view to what you’re working on:
F: Fit View to Selection (or to the whole document if the selection is empty)
Shift + F: Fit View to Document
Icons, Tooltips and Show/Hide Panels
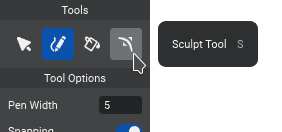
As you may have noticed in previous screenshots, our custom user interface library now finally supports using icons, so the interface will progressively become more user-friendly with less text and more icons. For example, here is how the Tools panel was upgraded:

Also, we implemented a system of tooltips such that waiting with your mouse cursor above an icon for a few seconds can give more info. For now, we use it to show the name and shortcut of tools (see below), but in the future we would also like to provide short documentation there to help users get started. This would complement a status bar which is not implemented yet.
Finally, the side panels now have a close icon (only visible on mouse hover) which, as expected, closes the panel. You can reopen them via the Panels menu in the menu bar. For now, reopening a panel always places it at the bottom, below all other panels. In the future, we will of course make them remember their previous location (both on close/open and on application restart), and we will also allow users to move them via drag-and-drop, which is not possible yet.
Roadmap to VGC Illustration 1.0
With all these new features, we’re getting closer to something that could be called a “beta version”, but we’re not there yet. While I cannot promise a release date, the current plan is to implement the remaining features in the following order, with approximately 1-2 months between beta versions:
Beta 1
- Ability to change the color of existing edges and faces
- Selection actions: select all, select vertices/edges/faces, add boundary/connected objects to selection
- Sketch Tool: improve smoothing of sketched strokes and provide user controls
- Auto-Cut: option to automatically create vertices at intersections between edges and cut faces while sketching
- Select Tool: highlight to-be-selected objects when hovering with the mouse before clicking
- Ask to save before quit (if there are unsaved modifications)
- Ability to specify the canvas size and show the borders of the canvas
- Export to raster formats (png, jpg)
- Status bar to show contextual help on available actions
- Cleanup the Colors panel: use icons, allow to show/hide settings, and other details
- Start writing online documentation
Beta 2 (focus on layers)
- Ability to create groups/layers
- Implement Layers panel to show the list of layers and the list of objects in the layer
Beta 3 (focus on shape editing)
- Direct control of Bézier control points
- Transform Tool: preserve aspect ratio, translate horizontally/vertically only, change anchor point
- Improve copy-paste actions: duplicate objects, copy-paste style only
- Align/Distribute tools
- Improve deformation of non-selected connected edges when moving objects, for example, prevent making them become a straight line
- Implement basic snapping when moving objects
Beta 4 (focus on edge style)
- Implement an Object Properties panel showing things like: color, cap/join style, etc.
- Implement Miter join style
- Allow to choose between Round/Butt/Square cap styles
- Allow to choose between Round/Bevel/Miter join styles
- Temporary/experimental mode to change the brush style of edge via predefined styles
Beta 5 (focus on general ergonomics)
- SVG import/export
- Panel drag-and-drop and remember positions on restart
- Shortcut editor
- Preferences dialog
And all of this should bring us to VGC Illustration 1.0, after taking into account your feedback and fixing all the bugs!
Future versions
Looking further into the future, here is a list of features, in no specific order, that will most likely not be in version 1.0, but should be in future versions (v2, v3, …):
- Basic shapes (lines, rectangles, ellipses, etc.)
- Color gradients
- Brush styles
- Text tool
- Python console and plugin system
- Translate the app to other languages
- Masking/clipping
- Bitmap images
- Color management (color profiles, CMYK, etc.)
- Boolean shape combinations (union, difference, etc.)
- Layer compositing (lighten only, darken only, multiply, burn, overlay, etc.)
- Layer effects (blur, shadows, etc.)
- Edge start/end markers (arrow heads, etc.)
- XML Editor
- And of course, start working on VGC Animation :)
Conclusion
Slowly but surely, we’re getting there.
Don’t hesitate to join the Discord to ask any questions, provide feedback on the current tools, or make feature requests. The sooner you do it, the more it can influence the software.
Thank you again for your patience!
Stay tuned
Found this news interesting? We can send the next ones straight to your inbox (around twice a month). Or we can simply let you know when VGC 1.0 is released. No spam guaranteed. You can unsubscribe at any time.